Goed, je heb zojuist een backup van je gegevens gebrand op een CD of DVD... Wat doe je vervolgens? Het schijfje in een hoesje stoppen en veilig opbergen?
Nee!
Eerst een duidelijk label maken, datum, tijd, welke data staat er op, etc.
En dan opbergen?
Nee.
Controleer je schijf! Stop het opnieuw in de CD/DVD drive en controleer of de schijf leesbaar is. Je hoeft de backup niet echt te draaien (helemaal als je met bijvoorbeeld Ghost een image hebt gemaakt), maar een snelle check om te zien of het zilveren schijfje leesbaar is neemt slechts een paar minuutjes in beslag en kán je een heleboel tijd (en drama's) schelen.
Extra Tip - Als de gebruikte backup software de optie biedt om de data te verifieren na het branden, selecteer deze optie dan. Het duurt eventjes, maar het biedt een extra zekerheid dat in geval van nood de backup schijf je in ieder geval niet in de steek laat!

Reset Windows Administrator Password
Niet direct aan backup gerelateerd, maar wel erg handig: Offline NT Password & Registry Editor.
Met dit superhandige programaatje is het mogelijk om het windows administrator wachtwoord te wijzigen. Ik heb hier bijvoorbeeld op mijn werk geen administrator rechten op mijn pc, maar ik moest dringend een programma installeren. Nu kon ik daarvoor wel een verzoek indienen bij de helpdesk, maar dit ging echt veel te lang duren.
Na enig zoekwerk op Google kwam ik op http://home.eunet.no/~pnordahl/ntpasswd/ terecht. Hier heb ik de installatiefiles gedownload en met behulp van het meegeleverde .bat bestand een floppy image gemaakt. Bij het opstarten moet je de floppy in de drive steken zodat hiervan geboot wordt. Er zal dan een zeer compacte versie van Linux worden opgestart en na een tijdje verschijnt een menu waarin de meest voor de hand liggende opties standaard al geselecteerd zijn. Je hoeft dus eigenlijk alleen maar een paar keer op enter te drukken om het wachtwoord te wissen.
Om administrator toegang te krijgen kun je het beste het administrator wachtwoord wissen met * in plaats van een nieuw wachtwoord te maken (bij mij werkte dit in ieder geval niet). Je kunt dan later altijd nog een nieuw administrator wachtwoord instellen na het inloggen.
Nadat je alle wijzigingen hebt opgeslagen dien je de computer opnieuw op te starten en zal de diskchecker automatisch worden gestart. Nu is het slechts een kwestie van dit proces te laten lopen en in te loggen met de gebruikersnaam 'Administrator', het password veld kun je leeg laten. Let op dat wanneer je normaal gesproken op een Windows domain inlogt, je dit moet wijzigen naar 'Local Computer'.
Ook voor thuisgebruikers is dit heel handig, indien je het administrator wachtwoord bent kwijtgeraakt hoef je niet meer Windows opnieuw op je pc te installeren!
Let op!
Indien je geen administrator rechten hebt op je werk-pc, is dit meestal gedaan uit veiligheids-oogpunt. Veel systeembeheerders zullen het niet op prijs stellen indien je deze beveiliging omzeilt!
Het gebruik van dit programma is geheel voor eigen risico, ik kan niet instaan voor eventuele problemen veroorzaakt door de Offline NT Password & Registry Editor.
Data backup Windows XP
Most people think about backing up data about 10 minutes after it's too late to do any good. If you realize that you really need a good backup program after your hard disk crashes or your teenager decides to clear out some of your files to make room for new music downloads, you're setting yourself up for a data disaster. Are you prepared to lose your e-mail address book (and all your messages)? What would you do if your entire collection of digital photos disappeared tomorrow in a puff of electrons? Do you have backup copies of your electronically-filed tax return or your crucial correspondence?
Fortunately, backing up your essential files is neither difficult nor time-consuming. In fact, the whole process can take as little as 10 minutes a week, and you can let Windows XP do most of the work.
Get Started
Before you can even think about creating a backup, you have to get your files in order. This doesn't mean you need to make like Felix Unger and compulsively rearrange every file in every folder. Just check to make certain all your essential data files are stored in one easy-to-find location.
Windows XP makes this task especially easy by giving every user account its own personal profile, which consists of a set of subfolders in the Documents and Settings folder. Your profile holds your personal files (in the My Documents folder), Outlook Express e-mail messages, Internet Explorer Favorites and cookies, and information about your settings and preferences. If you have personal data stored elsewhere, consider moving it into the My Documents folder to make backing up easier. If you're unwilling or unable to move those files, make a note of where they're located so you can be sure you add them to your backup set later.
Open Windows XP Backup
Windows XP includes its own backup program, although you may need to do some digging to find it. You can also take your pick of third-party programs (see backup.pagina.nl) that add bells and whistles you won't find in the basic Windows XP Backup utility.
If you use Windows XP Professional, the Windows Backup utility (Ntbackup.exe) should be ready for use. If you use Windows XP Home Edition, you'll need to follow these steps to install the utility:
Decide What to Back Up
You might be tempted to click All information on this computer so that you can back up every bit of data on your computer. Think twice before choosing this option, however. If you've installed a slew of software, your backup could add up to many gigabytes. For most people, the My documents and settings option is a better choice. This selection preserves your data files (including e-mail messages and address books) and the personal settings stored in the Windows Registry.
If several people use your computer—as might be the case on a shared family PC—select Everyone's documents and settings. This option backs up personal files and preferences for every user with an account on the computer.
If you know that you have data files stored outside your profile, click Let me choose what to back up. This option takes you to the Items to Back Up page shown in Figure 2.
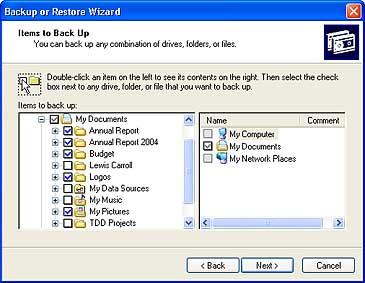
Figure 2
Select the My Documents check box to back up all the files in your personal profile, and then browse the My Computer hierarchy to select the additional files you need to back up. If some of your files are on a shared network drive, open the My Network Places folder and select those folders.
This option also comes in handy if you have some files you now you don't want to back up. For instance, I have more than 20 GB of music files in the My Music folder. To keep my data file backup to a reasonable size, I click the check box next to the My Music folder. This clears the check box from all the files and subfolders in My Music.
Decide Where to Store Your Backup Files
On the Backup Type, Destination, and Name page, Windows asks you to specify a backup location. If you're one of those exceedingly rare individuals with access to a backup tape, the Backup utility gives you a choice of options in the Select a backup type box. No tape drive? No problem. Backup assumes you're going to save everything in a single file; you just have to choose a location for that file and give it a name.
By default, Backup proposes saving everything to your floppy drive (drive A). Although that might have made sense 10 years ago, it's hardly a rational choice today. You'd need dozens, perhaps hundreds of floppy disks to store even a modest collection of data files, especially if you collect digital music or photos.
Instead, your best bet is to click Browse and choose any of the following locations:
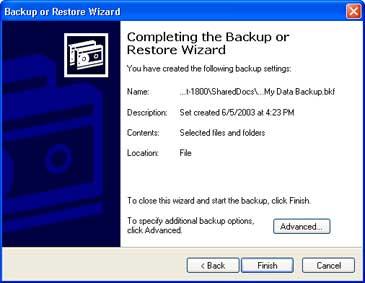
Figure 3
Set a Schedule—and Stick to It
If you're disciplined enough, you can repeat the above steps once each week and perform regular backups when you're ready. If you'd rather not count on remembering to perform this crucial task, however, set up an automatic backup schedule for Windows. When you get to the final page of the Backup Wizard (see Figure 3 above), don't click Finish. Instead, click the Advanced button, and click Next to open the When to Back Up page. Choose Later, and then click Set Schedule to open the Schedule Job dialog box shown in Figure 4.
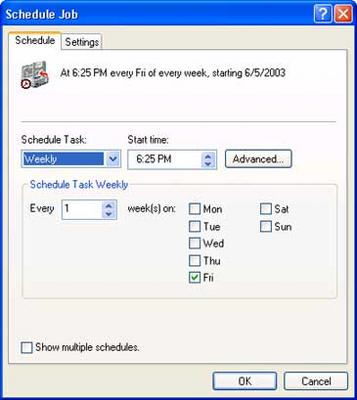
Figure 4
This example shows the settings for a weekly backup on Friday afternoon—a good way to make sure your week's work is protected. But you can set almost any schedule you want by poking around in the extensive set of options available in this dialog box. After you click OK to save your changes, Windows XP runs the backup automatically. Just remember to leave your computer turned on.
All in all, you can count on backing up 5 GB of data in as little as 10 minutes. And you don't need to worry about shutting down running programs, either—thanks to a feature called volume shadow copy, the Backup utility can safely create a copy of any file, even if it's currently in use. For more information, see the Microsoft TechNet article, Volume Shadow Copy Technology.
Other Backup Alternatives
The Windows Backup utility is handy and free, but it's not your only backup choice. Depending on your preferences, you can choose all sorts of third-party backup solutions. For instance:
Fortunately, backing up your essential files is neither difficult nor time-consuming. In fact, the whole process can take as little as 10 minutes a week, and you can let Windows XP do most of the work.
Get Started
Before you can even think about creating a backup, you have to get your files in order. This doesn't mean you need to make like Felix Unger and compulsively rearrange every file in every folder. Just check to make certain all your essential data files are stored in one easy-to-find location.
Windows XP makes this task especially easy by giving every user account its own personal profile, which consists of a set of subfolders in the Documents and Settings folder. Your profile holds your personal files (in the My Documents folder), Outlook Express e-mail messages, Internet Explorer Favorites and cookies, and information about your settings and preferences. If you have personal data stored elsewhere, consider moving it into the My Documents folder to make backing up easier. If you're unwilling or unable to move those files, make a note of where they're located so you can be sure you add them to your backup set later.
Open Windows XP Backup
Windows XP includes its own backup program, although you may need to do some digging to find it. You can also take your pick of third-party programs (see backup.pagina.nl) that add bells and whistles you won't find in the basic Windows XP Backup utility.
If you use Windows XP Professional, the Windows Backup utility (Ntbackup.exe) should be ready for use. If you use Windows XP Home Edition, you'll need to follow these steps to install the utility:
- Insert your Windows XP CD into the drive and, if necessary, double-click the CD icon in My Computer.
- On the Welcome to Microsoft Windows XP screen, click Perform Additional Tasks.
- Click Browse this CD.
- In Windows Explorer, double-click the ValueAdd folder, then Msft, and then Ntbackup.
- Double-click Ntbackup.msi to install the Backup utility.
- Click Start, point to All Programs, point to Accessories, point to System Tools, and then click Backup to start the wizard.
- Click Next to skip past the opening page, choose Back up files and settings from the second page, and then click Next. You should see the page shown in Figure 1, which represents your first decision point.
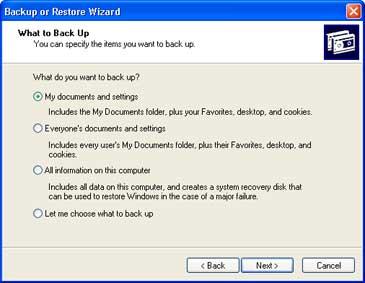
Figure 1

Decide What to Back Up
You might be tempted to click All information on this computer so that you can back up every bit of data on your computer. Think twice before choosing this option, however. If you've installed a slew of software, your backup could add up to many gigabytes. For most people, the My documents and settings option is a better choice. This selection preserves your data files (including e-mail messages and address books) and the personal settings stored in the Windows Registry.
If several people use your computer—as might be the case on a shared family PC—select Everyone's documents and settings. This option backs up personal files and preferences for every user with an account on the computer.
If you know that you have data files stored outside your profile, click Let me choose what to back up. This option takes you to the Items to Back Up page shown in Figure 2.

Figure 2
Select the My Documents check box to back up all the files in your personal profile, and then browse the My Computer hierarchy to select the additional files you need to back up. If some of your files are on a shared network drive, open the My Network Places folder and select those folders.
This option also comes in handy if you have some files you now you don't want to back up. For instance, I have more than 20 GB of music files in the My Music folder. To keep my data file backup to a reasonable size, I click the check box next to the My Music folder. This clears the check box from all the files and subfolders in My Music.
Decide Where to Store Your Backup Files
On the Backup Type, Destination, and Name page, Windows asks you to specify a backup location. If you're one of those exceedingly rare individuals with access to a backup tape, the Backup utility gives you a choice of options in the Select a backup type box. No tape drive? No problem. Backup assumes you're going to save everything in a single file; you just have to choose a location for that file and give it a name.
By default, Backup proposes saving everything to your floppy drive (drive A). Although that might have made sense 10 years ago, it's hardly a rational choice today. You'd need dozens, perhaps hundreds of floppy disks to store even a modest collection of data files, especially if you collect digital music or photos.
Instead, your best bet is to click Browse and choose any of the following locations:
- Your computer's hard disk. The ideal backup location is a separate partition from the one you're backing up. If your hard disk is partitioned into drive C and drive D and your data is on drive C, you can safely back up to drive D.
- A Zip drive or other removable media. At 100-250MB per disk, this is an option if you don't have multiple gigabytes to back up. Unfortunately, the Windows Backup utility can't save files directly to a CD-RW drive.
- A shared network drive. You're limited only by the amount of free space on the network share.
- An external hard disk drive. USB and IEEE 1394 or FireWire drives have dropped in price lately. Consider getting a 40 GB or larger drive and dedicating it for use as a backup device.

Figure 3
Set a Schedule—and Stick to It
If you're disciplined enough, you can repeat the above steps once each week and perform regular backups when you're ready. If you'd rather not count on remembering to perform this crucial task, however, set up an automatic backup schedule for Windows. When you get to the final page of the Backup Wizard (see Figure 3 above), don't click Finish. Instead, click the Advanced button, and click Next to open the When to Back Up page. Choose Later, and then click Set Schedule to open the Schedule Job dialog box shown in Figure 4.

Figure 4
This example shows the settings for a weekly backup on Friday afternoon—a good way to make sure your week's work is protected. But you can set almost any schedule you want by poking around in the extensive set of options available in this dialog box. After you click OK to save your changes, Windows XP runs the backup automatically. Just remember to leave your computer turned on.
All in all, you can count on backing up 5 GB of data in as little as 10 minutes. And you don't need to worry about shutting down running programs, either—thanks to a feature called volume shadow copy, the Backup utility can safely create a copy of any file, even if it's currently in use. For more information, see the Microsoft TechNet article, Volume Shadow Copy Technology.
Other Backup Alternatives
The Windows Backup utility is handy and free, but it's not your only backup choice. Depending on your preferences, you can choose all sorts of third-party backup solutions. For instance:
- Want to back up your e-mail and nothing else? Try OutBack Plus 4 or the Microsoft Outlook Personal Folders Backup Utility if you use any version of Microsoft Outlook, or use OE Backup for Outlook Express. These programs specialize in helping you keep safe copies of your messages and addresses.
- Want the option to restore your entire hard drive in case of a crash? Drive imaging tools like PowerQuest Drive Image 2002 can take a virtual snapshot of your disk, compress it to a single file, and save it for quick recovery later.
- Worried that fire, flood, or theft will wipe out your backup copies along with your computer? Consider paying a few dollars a month for online backup alternatives like Xdrive Plus or @Backup, where you can upload your most important files for storage on a secure server.
Maxtor 1 Terabyte externe backup
 De bekende harde schijf maker Maxtor heeft aangekondigd vanaf December een externe backup oplossing te gaan leveren die maar liefst 1 terabyte aan informatie kan opslaan.
Het 2.6 kg wegende apparaat kan door middel van Firewire 800, Firewire 400 of USB 2.0 aangesloten worden. Indien de computer het ondersteunt, is het zelfs mogelijk om van de externe schijf op te starten.
De Maxtor OnTouch III Turbo zal geleverd worden in versies met 600 Gigabyte, 750 Gigabyte en de al genoemde 1 Terabyte opslagruimte. De duurste versie zal 899 dollar gaan kosten, een nogal stevige prijs voor thuisgebruikers.
Maxtor levert overigens op dit moment overigens al veel vriendelijker geprijsde externe harde schijven waar het heel makkelijk mee is om snel een backup mee te maken met capaciteiten tot 300 Gigabyte, zie hun online shop voor meer informatie.
Download ntbackup.msi
Uit de Nedstat statistieken is gebleken dat een groot aantal bezoekers van deze pagina op zoek zijn naar het bestand ntbackup.msi. Dit is het installatiebestand om het backup programma onder Windows XP te installeren.
Om deze bezoekers niet teleur te stellen bij dezen een aantal download locaties:
www.onecomputerguy.com/software/ntbackup.msi
home.comcast.net/~cerelli/ntbackup.msi
www.winxptutor.com/ntbackup.msi
yves.masur.microclub.ch/files/out/ntbackup.msi
www.myscacc.org/Forms/ntbackup.msi
Dit bestand staat overigens ook gewoon op de Windows installatie CD in de map \VALUEADD\MSFT\NTBACKUP.
Ik stel het op prijs indien als dank voor deze handige informatie een bezoekje wordt gebracht aan de websites van de sponsors van dit weblog.
Niet (meer) werkende links kunnen worden doorgegeven in het reactieformulier van deze post.
Abonneren op:
Reacties (Atom)